Quick start
From installation to your first order in seven steps. Each step is short; the details are behind the links.
1.Download and install
Download the terminal on the Download page: an .exe installer for Windows, builds for Apple Silicon and Intel for macOS. Run the installer and follow the wizard’s instructions. Installation, the first launch on a Mac and updates are covered in Installation and updates.
| System | Requirements |
|---|---|
| Windows | Windows 10 or 11, x64 |
| macOS | macOS 14 or later, Apple Silicon or Intel |
A mobile app for iOS and Android is also available — see Mobile app: installation.
2.Sign up and sign in
One JetScalp account works for the website, the terminal and the mobile app: you use the same email and password to sign in to your account on the website, to the terminal and to the app.
Registration
Accounts are created on the website or in the mobile app. Signing up on the website is described below.
- Open the Sign up page, enter your email and choose a password: at least 10 characters, with at least one letter and one digit, and no spaces at the start or the end.
- Open the email from JetScalp, follow the link in it and enter the password you signed up with — this confirms your email and signs you in. The link is valid for 2 hours. If the email has not arrived, check your spam folder or request it again on the sign-in page. Forgot the password? Reset it: that confirms the email too.
- Once confirmed, your email and password work on the website, in the terminal and in the mobile app.
Signing in to the terminal
- Launch the JetScalp application. The sign-in window appears.
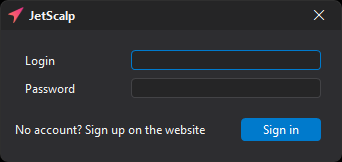
- Enter your account email in the Login field and your password in the Password field.
- Click Sign in.
If you do not have an account yet, the No account? Sign up on the website link in the sign-in window opens the sign-up page on the website.
Type your email exactly as you registered it: the terminal distinguishes uppercase and lowercase letters in the login.
The terminal does not store your password, but it saves the session: on subsequent launches you are signed in automatically. The sign-in window appears again if the session has ended: you signed out with Settings → Log out, changed your password, or ended the session in your account on the website.
To sign in with another account, enter its email in the Login field in the Authorization settings: the terminal opens the sign-in window on the next launch.
Password recovery and change
- Forgot your password? Open the Password recovery page, enter your email and follow the link in the email. The new password works on the website, in the terminal and in the mobile app.
- To change your password, use your account page on the website. Terminals and apps where you are signed in will ask you to sign in with the new password.
3.Add a connection
Quotes, order books and charts of crypto exchanges are available right after sign-in, with no connection. To trade and see your balance, positions, orders and trades, add a trading connection: Settings → Connections (Connections).
- Crypto exchanges: Binance, Bybit, OKX and others — in the “Crypto exchanges” section.
- MOEX: QUIK, Finam, T-Invest, BCS, Vataga Prop.
Important: For crypto exchanges, create an API key without withdrawal rights — the terminal does not need them.
4.Open windows
After installation, the terminal already opens a layout: six order books of BTC, ETH and XRP against USDT on Binance (spot and futures), each with its chart below, linked to the order book. You can start with it or add windows from the Windows menu on the main panel. A minimal set:
- Watchlist — a list of symbols (Watchlist).
- Order book — trading, tape and clusters (Order book).
- Chart (Chart).
Choose a symbol with the Symbols button on the window panel (Symbols). To make the order book and chart follow the Watchlist, assign the windows the same link color (Window linking).
5.Set up order sizes and hotkeys
Set the order size in Order sizes and check the mode — Lot or $ (quote currency). Then review the Order book hotkeys.
Important: Trading hotkeys work in the active order book window right after installation.
Command Default Buy market ↑ Sell market ↓ Close position Ctrl Cancel all orders Space Reverse position Tab Set order size 1 … Set order size 5 1 … 5 If you do not plan to use them, reassign or clear them in Hotkeys.
6.Place your first order
By default, a left click on a price in the order book places a buy limit order and a right click places a sell limit order, using the active order size. An order at a price worse than the market is filled immediately. Double-clicking the order’s volume marker with the left button cancels it. You can choose another scheme with the Mouse trading option in the order book hotkeys.
More: Trading from the order book, Limit orders, Market orders. Orders, trades and positions are in the Trading windows (Trading tables).
7.Save your workspace
Arrange the windows in tabs or move them to separate workspace windows for other monitors (Main window). Save the result: Settings → Configuration → Save (Configuration).
Important: Exchange connections are not included in the configuration — on another computer you need to add them again.