Authorization and Telegram ID
The Authorization section shows which account you are signed in to the terminal with, and lets you link Telegram to receive notifications about triggered alerts.
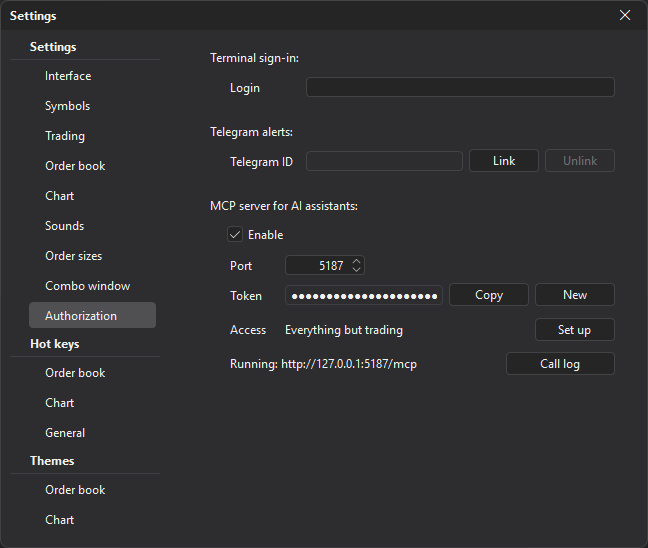
| Parameter | Description |
|---|---|
| Login | The email of the JetScalp account you are signed in with. To sign in with another account, enter its email: the terminal opens the sign-in window on the next launch. How the account and sign-in work is described in Quick start, step 2. |
| Telegram ID | The identifier of the linked Telegram chat. The field only displays the value: the chat is linked with the Link button. |
| Link | Opens a link to the JetScalp bot in Telegram to link a chat to your account. |
| Unlink | Unlinks the chat: notifications are no longer sent to Telegram. |
Linking Telegram
The linked Telegram chat receives notifications about triggered alert levels.
- Click Link. The terminal opens a link to the JetScalp bot in Telegram (or in the browser if Telegram is not installed).
- In the chat with the bot, tap Start.
- Within a few seconds, the chat identifier appears in the Telegram ID field.
The link is valid for 10 minutes. If linking is not completed during this time, click Link again.
The chat is linked to your account, not to your computer: it appears in the settings on all devices where you are signed in to this account.
To receive notifications in a different chat, click Unlink, then click Link and confirm the link in the chat you need.
Linking requires a connection between the terminal and the JetScalp server. If the link cannot be obtained, the terminal shows an error message — check your internet connection and try again.
Trading connections to exchanges are configured separately, in the Connections window.
MCP server for AI assistants
The MCP server for AI assistants: block connects an AI assistant to the terminal — Claude, Cursor and other programs that support MCP. Here you turn the server on (Enable, off by default) and set the Port and the Token. The New button creates a new token — the terminal asks for confirmation first: connected assistants stop working until they are given the new token.
In the Access row, the Set up button opens the AI assistant access window: the Market, Windows, Chart, Alerts, Account, Trading groups and the trading limits without a confirmation — Order up to, $, Order up to, ₽, Actions a day. See What the assistant can use for details. The Call log button shows what the assistant has called since the terminal started.
How to turn the server on and connect an assistant is described in AI assistant.