Connections and accounts
A connection links the app to your account at an exchange or broker: through it, JetScalp shows your balance, positions and orders and sends new orders. Until a real account is connected and chosen, orders go to a demo account — without risk, at exchange prices.
Exchanges connect with API keys, Aster DEX and Hyperliquid with a wallet through WalletConnect, and Moscow Exchange brokers with a login and password or an API token. Terminal connections are not transferred to the app: on the phone you add them separately.
Demo account and real account
A demo account is created for each exchange automatically: 10,000 USDT, or 1,000,000 RUB for the Moscow Exchange. Orders fill at exchange prices, but the money isn’t real. The fill rules are conservative: a resting limit order fills only when the market trades through its price, and an order crossing the spread fills at the best price. Demo account fees: futures — 0.02% maker and 0.05% taker, spot — 0.1%. The default leverage is 10x with cross margin.
A real account is the account of a connection at an exchange or broker. The exchange executes its orders with real money.
Choosing the account for orders
The account that receives your orders is shown on the account bar below the order book. The chart of that symbol uses the same account.
- Tap the account name on the account bar.
- In the Account for orders menu, choose Demo account or a connection of this exchange — connections show the exchange logo (for the Moscow Exchange — the broker’s). Connections… opens the list of connections.
- If you chose a real account, confirm: “Trade on the real account?” → Real account.
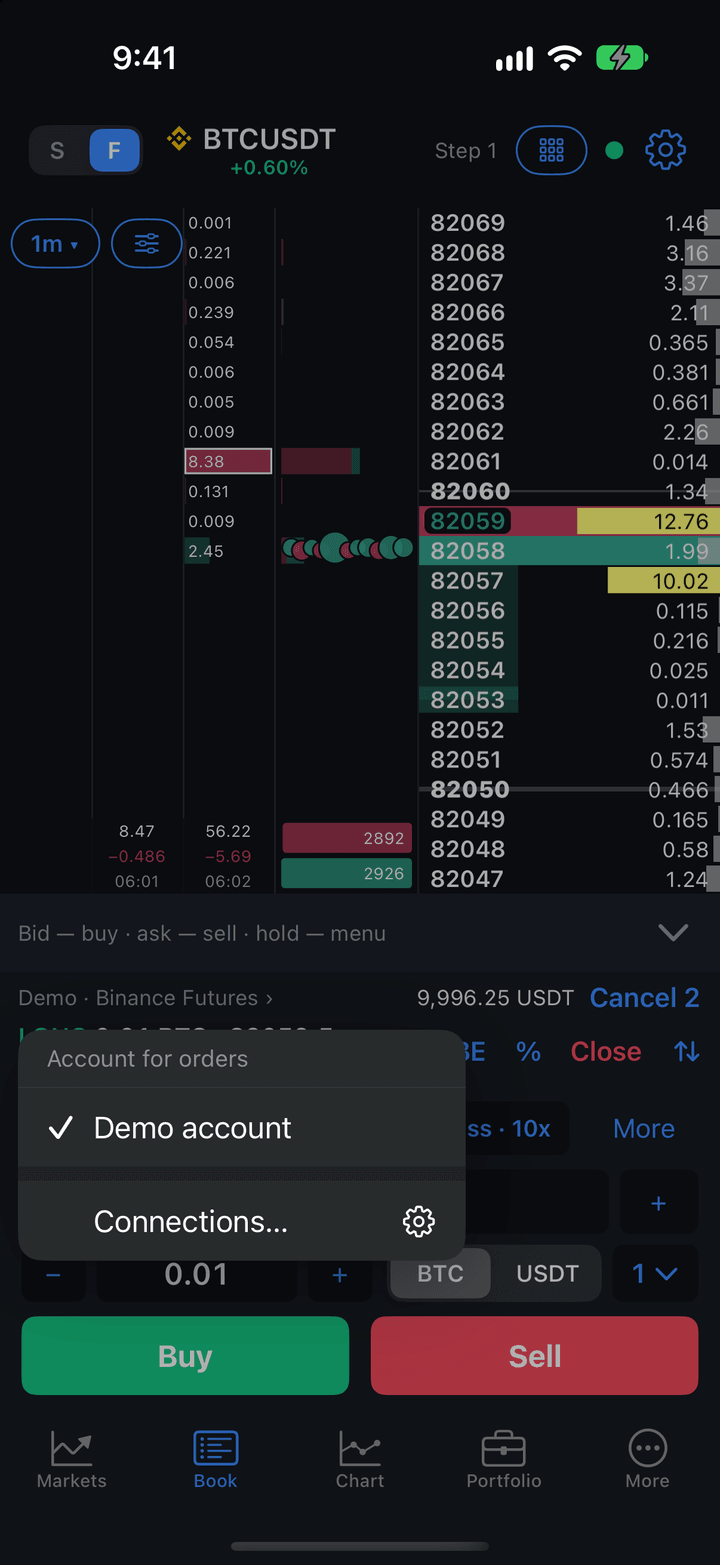
The choice applies to all symbols of the exchange (on Binance, Bitget, Gate and others — to both spot and futures): an exchange has one account for orders. The chosen connection replaces the previous account: the demo account, another connection of the same exchange or another Moscow Exchange broker. Adding a connection doesn’t change the account for orders — a real account is only ever chosen explicitly.
A real account on the account bar is shown in bold, in the connection’s name color, and its name appears in every trade confirmation. If the chosen real account isn’t connected, the label says ” · not connected ›”, and orders are not sent — the app never silently switches to the demo account. If the connection to the account dropped and the app is reconnecting on its own, the label says ” · reconnecting ›”; an order is then not sent, and the app replies “Reconnecting to the account”.
The order book and chart show orders and the position of the chosen account only. If the account changed while you were preparing an order, the order is not sent, and the app tells you the account has changed.
Important: On a real account orders are filled with real money. Before placing an order, check the account name on the account bar: a real account shows the connection name, a demo account — “Demo · …”.
Turning off demo accounts
If you don’t need demo accounts, turn them off: More → Settings → Accounts → Demo accounts. Demo orders and positions are erased, and only real accounts remain in the account choice and in Portfolio. Until a real account is chosen, the account bar says “No account selected”, and orders are not sent.
When you turn demo accounts on again, each exchange gets a new demo account with the starting balance.
Adding a connection
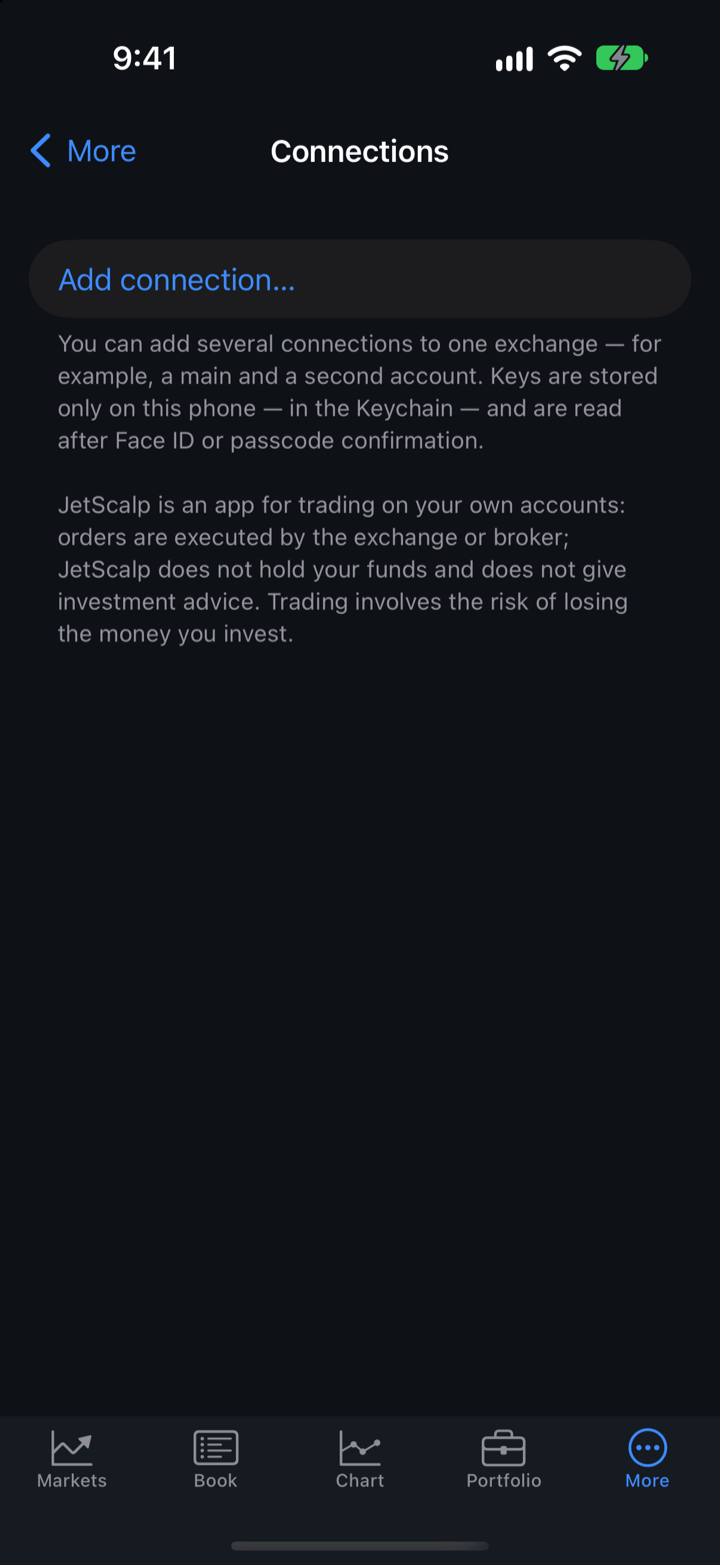
- Open More → Connections.
- Tap Add connection….
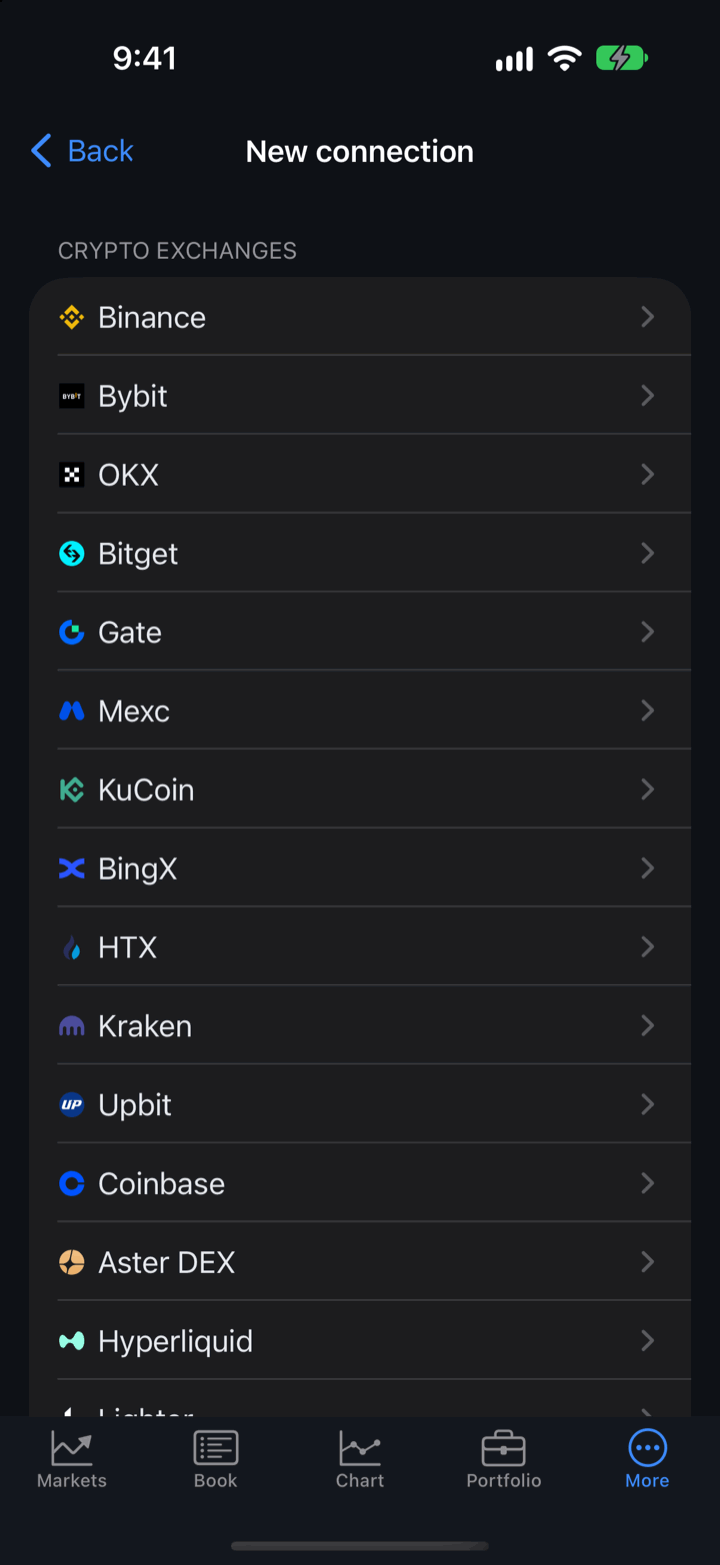
- On the New connection screen, choose an exchange or broker: they are grouped into Crypto exchanges and Moscow Exchange.
- Fill in the fields. The note below the fields says what to do before entering them and what to know about this exchange.
- Tap Verify & save.
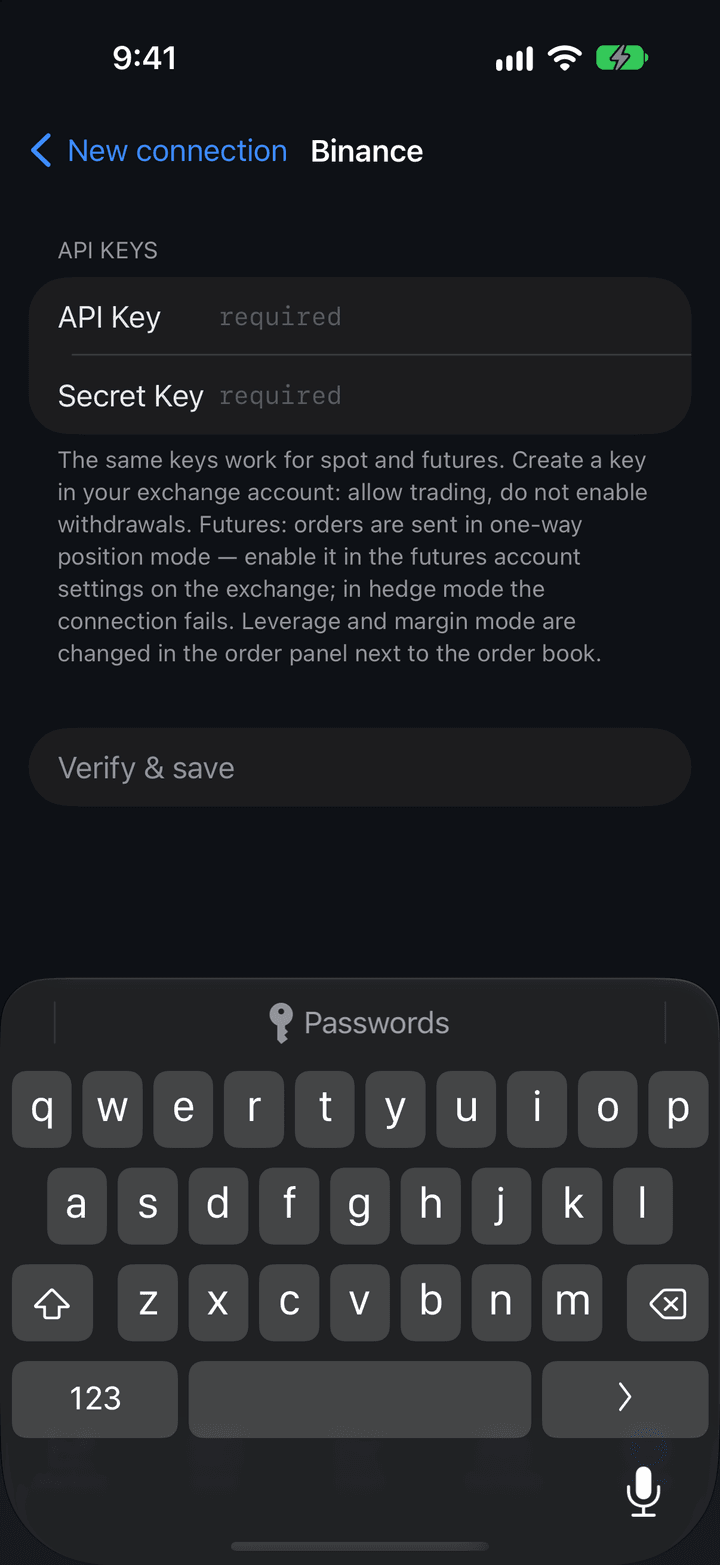
The app connects to the exchange with the keys you entered and saves them only if the connection succeeds. The progress and the exchange’s response are shown on the screen, for example ”(-2015) Invalid API-key…”; on an error, what you entered stays in the fields. For an exchange with spot and futures, the connection is saved if at least one market works — the other one shows the reason in its status.
Going back during the check cancels it and clears the fields. After a successful check, the settings of the new connection open.
You can add several connections to one exchange — for example, a main and a second account. The second one is named “Binance 2”; you can rename it.
An API key is created in your exchange account: allow trading and do not enable withdrawals. How to create a key on each exchange is described in Connections of the terminal documentation; in the app you enter the same values.
What to enter
| Venue | Fields | What to know |
|---|---|---|
| Binance | API Key, Secret Key | The same keys work for spot and futures. Futures use one-way position mode. |
| Bybit | API Key, Secret Key | Requires a Unified Trading Account. |
| OKX | API Key, Secret Key, Passphrase | Spot and perpetual contracts share one account. |
| Bitget | API Key, Secret Key, Passphrase | The same keys work for spot and futures. |
| Gate | API Key, Secret Key | The same keys work for spot and futures. |
| Mexc | API Key, Secret Key | Allow futures trading for the key. Leverage and margin mode are those set on the exchange. The app executes spot stop loss and take profit. |
| BingX | API Key, Secret Key | The same keys work for spot and perpetual contracts. The app executes spot stop loss and take profit. |
| HTX | Access Key, Secret Key | USDT-M futures work through API V5, cross margin only. The app executes futures stop loss and take profit. |
| Kraken | Spot: API Key, Private Key; futures: Public Key, Private Key | Spot and futures keys are different; the keys of one market are enough. The futures key is created in the Futures section of your Kraken account. When replacing keys, an empty section keeps the market’s current key. Futures leverage and margin mode are those set on the exchange. |
| KuCoin | API Key, Secret Key, Passphrase | Requires a Unified Trading Account. |
| Upbit | Access Key, Secret Key | The key works only from allowed IP addresses, and the phone’s address changes with the network (mobile data, Wi-Fi). The app executes stop loss and take profit. |
| Coinbase | Key name, Private key | Spot (Advanced Trade). A Coinbase Developer Platform key; paste the whole private key from the downloaded file. |
| Lighter | Account index, API private key, API key index | Perpetual contracts only. Plus and Premium accounts need to approve the fee. |
| Aster DEX | Wallet | Connects through WalletConnect — see Connecting a wallet. |
| Hyperliquid | Wallet | Connects through WalletConnect — see Connecting a wallet. |
| Vataga Prop | Server, Login, Password | The server is Main, Reserve or Test. |
| T-Invest | T-Invest API token | A token with trading access. |
| Finam | Finam Trade API token | The token (secret) from your Finam account. |
| BCS | BCS Trade API token | A trading token: the app won’t accept a read-only token. Account funds are not shown yet. |
Crypto exchange futures work only in one-way position mode: enable it in the futures account settings on the exchange. The app doesn’t change the mode, and in hedge mode the connection fails. Leverage and margin mode are changed in the order panel next to the order book.
Moscow Exchange brokers
Vataga Prop, T-Invest, Finam and BCS require signing in to the JetScalp server (More → Sign-in, see Account and sign-in): the Moscow Exchange symbol list comes from it.
Moscow Exchange quotes come from one broker. If another connection already provides them, the next one only trades. This is set by the Receive quotes switch in the broker connection’s settings.
After signing in, a broker loads the account’s orders, trades and positions — on a slow connection this takes minutes. While loading, the status says “Signed in · loading account data…”; you can trade on the account once it has fully loaded.
Connecting a wallet
Aster DEX and Hyperliquid connect with a wallet — MetaMask or another wallet that supports WalletConnect. You don’t enter a seed phrase: the wallet only signs a permission.
- Open More → Connections → Add connection… and choose Aster DEX or Hyperliquid. The Connect wallet screen opens.
- Tap Open MetaMask. For another wallet, tap Another wallet, or tap Copy WalletConnect link and paste the link in your wallet.
- In the wallet, approve the JetScalp connection.
- Sign the permissions. When the wallet is waiting for a signature, the app opens it by itself; if it doesn’t, tap Open wallet. The Progress section shows how many signatures are left: “Sign in the wallet: 1 of 2”.
- When “Wallet connected” appears, the settings of the new connection open.
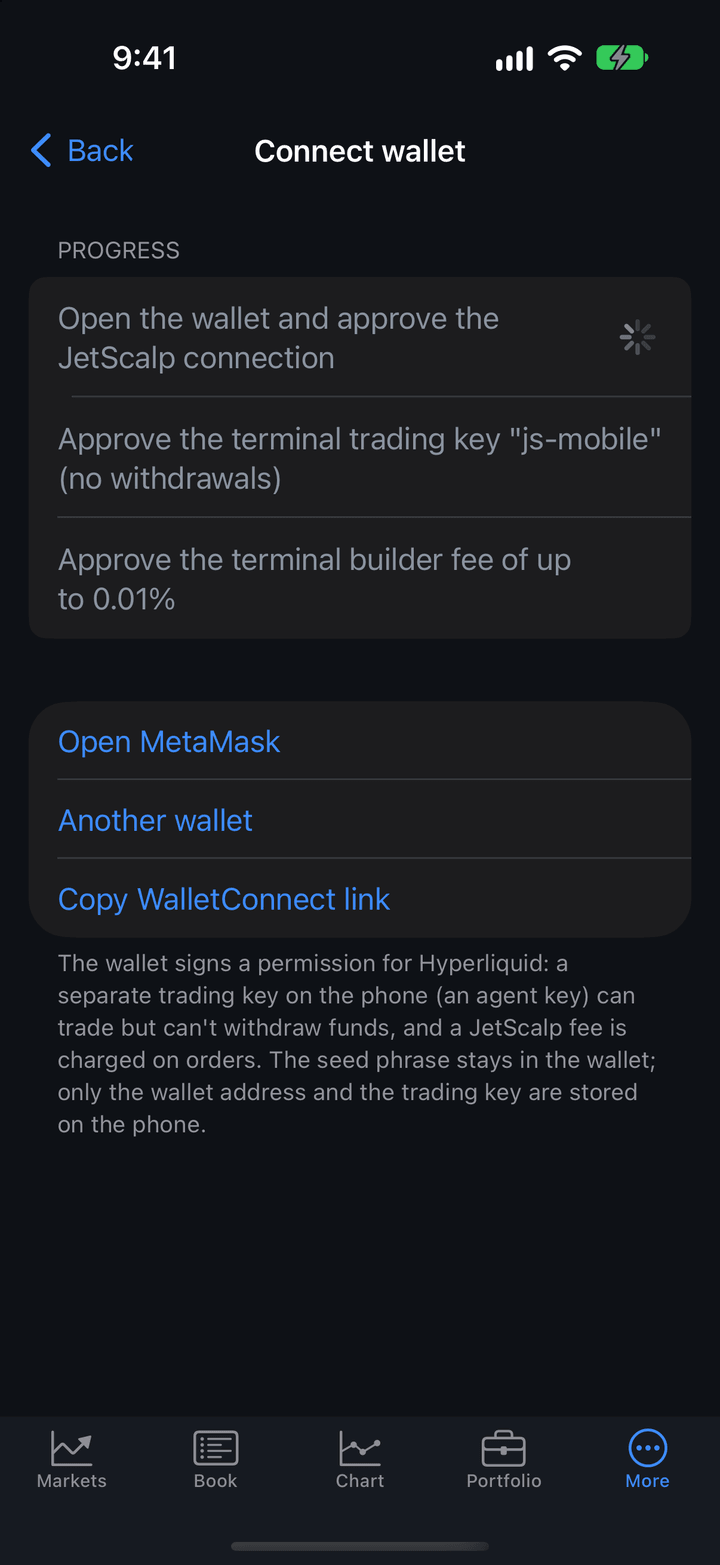
The wallet signs a permission for a separate trading key on the phone: this key can trade but can’t withdraw funds. Together with it, the wallet approves the JetScalp fee: up to 0.1% of the order volume on Aster DEX and 0.01% of the order volume on Hyperliquid. Only the wallet address and the trading key are stored on the phone.
If the wallet doesn’t respond within 5 minutes, the connection stops — tap Try again. Leaving the screen cancels the connection.
The phone has its own trading key, separate from the terminal’s: connecting the wallet on the phone doesn’t disconnect it in the terminal. If the exchange stops accepting the trading key (on Aster DEX it is valid for a year, or the key was deleted on the exchange website), connect the wallet again: Change wallet in the connection settings.
For Aster DEX Futures, enable one-way position mode in the Aster settings — in hedge mode the connection fails.
Never enter your seed phrase or wallet private key in JetScalp, and never share them with anyone.
JetScalp never asks for a seed phrase, either on the phone or in the terminal. The seed phrase stays in your wallet, and you confirm signatures in the wallet itself.
Lighter: approve fee
Lighter Plus and Premium accounts connect only if the account owner has approved the JetScalp fee of 0.01% of the perpetual contract order volume. Standard accounts are not charged and need no approval.
Without the approval, the connection fails, and the app says: “Lighter: the account has not approved the JetScalp 0.01% fee — click Approve fee in the connection settings and sign the approval with the account’s wallet.”
- Open More → Connections and tap the Lighter connection.
- Tap Approve fee. If the app asks, confirm reading the keys — with Face ID, fingerprint or passcode.
- Open the wallet the same way as when connecting a wallet: Open MetaMask, Another wallet or Copy WalletConnect link.
- In the wallet, choose the wallet that owns the Lighter account and sign “JetScalp fee approval 0.01%”.
- When Lighter accepts the approval, the connection reconnects with the same keys.
The approval is signed once, and the connection keys stay the same. If another address is selected in the wallet, the app names the address of the right wallet — switch to it and try again.
If you add a new Plus or Premium account that has never approved the fee, the key check fails and the connection is not saved. Then Approve fee appears under the error message: tap it and follow steps 3–4 — after the approval the connection is saved with the keys you entered.
Connection settings
Tap a connection in More → Connections to open its settings. In the list, the exchange and the status appear under the connection name: “Binance · connected”, ”… · connecting…”, ”… · partly connected”, ”… · reconnecting…”, ”… · connection error” or ”… · not connected”. “Reconnecting” means the connection dropped and the app is restoring it on its own: nothing to do. “Connection error” means the connection failed; the reason is in the connection settings.
| Setting | Description |
|---|---|
| Name | The connection name. Tap to rename. |
| Exchange | The connection’s exchange or broker. |
| Name color | The color of the connection name on the account bar and in Portfolio, so accounts of different connections are easy to tell apart. White when not chosen. |
| Status | The last characters of the key and the status of each market: “Spot: connected”, “Futures: reconnecting — no connection”, “Futures: not connected” or the error text. |
| Connect automatically | Connects when the app starts — after unlocking, without a separate prompt. On by default. |
| Receive quotes | Moscow Exchange brokers only: take quotes from this broker. The change takes effect on the next connection. |
| Server | Vataga Prop only: Main, Reserve or Test. When the server changes, an active connection reconnects to the selected one. |
| Connect, Disconnect | Connect with the saved keys or disconnect. If only one of two markets works, both commands are available. |
| Replace keys | Enter new keys: for brokers — Replace token or Change login, for a wallet — Change wallet. The name and the account choice are kept; if the new keys fail the check, the old ones stay. |
| Approve fee | Lighter only — see Lighter: approve fee. |
| Delete connection | Erase the keys from the phone. Orders and positions on the exchange are not affected. |
Where keys are stored
Keys, tokens and broker passwords are stored only on this phone:
- on iPhone and iPad — in the Keychain; the app reads them after Face ID or passcode confirmation;
- on Android — in Android secure storage; the app reads them after you confirm with fingerprint, face or PIN.
Keys are not written to the app’s files and don’t get into the app log or the report to support. At startup, one confirmation is enough for all connections with Connect automatically to connect.
Without a screen lock on the device, keys can’t be saved: Add connection… is missing, and the Connections screen explains how to set a passcode (iPhone) or a PIN, password or pattern (Android).
Where stop loss and take profit are executed
On real accounts, a position’s stop loss and take profit are placed as orders on the exchange and trigger even when the app is closed.
The app executes the levels itself, based on quotes, on these accounts:
- the demo account;
- HTX USDT-M;
- Mexc, BingX and Upbit spot;
- Hyperliquid spot — the stop loss (the take profit is placed on the exchange as a limit order);
- T-Invest — the take profit of a position that also has a stop loss.
Position levels are available on spot too, on every exchange.
Where a level is executed is shown in the position row in Portfolio and in its card: “on the exchange”, “placing…”, or no mark — the app executes the level (Portfolio).
If the exchange rejects a level, it is removed, and the app shows the “Stop loss rejected by the exchange” (or take profit) window — set another level.
Important: A stop loss and take profit executed by the app do not trigger while JetScalp is in the background or closed: in the background the app receives no quotes. If a real account has such levels, the app sends a “Stops are not on the exchange” notification when you leave it; tapping it opens the positions.
Security
Never share your API keys, broker tokens, passwords or seed phrase — not in chats or Telegram, not with support, not in screenshots.
- Don’t enable withdrawals or transfers for the key: trading doesn’t need them.
- If a key may have been exposed, delete it on the exchange, create a new one and enter it in the app: Replace keys in the connection settings.
- Before sending screenshots or logs, remove balances, keys and wallet addresses from them.